

Author’s note : This post was originally written on Midsummer’s Day in 2011. We needed the blind to work as we were being woken up by the light far too early.
The early morning sunshine is just too early for us and we decided to fit a dual purpose blackout/sunscreen blind in the hall landing window, which is a Velux rooflight.
We followed the usual drill, check everything is there, read the leaflet, read it again. There is a company video which you can see on YouTube as well. We’d fitted one of these a few years ago to another window with no problems.
Only this time, we clicked the blind into place and something fell out of the unit. We had to take it out to fix it…… easier said than done…….
Sometimes Google lets you down in the quest for a fix to a problem, not often, but on this occasion it did as does the Velux website.
Reluctant to admit that there is no built in way to get this blind out, a little click here, or an undo button there, Velux have chosen not to put anything about the possibility that you might want to remove it on their website or in the cryptic pdf that they have produced to tell you how to install this blind.
For the record and for anyone else in this position out there in the universe this is the advice, word for word, that Velux Customer Services give you when you phone them:
- You may break the glass doing this….but there is no other way to do this. The blinds are a really tight fit.
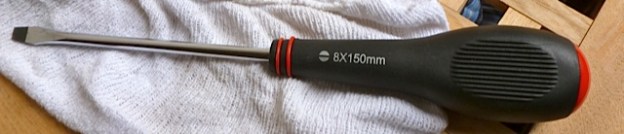
- Get a fairly large broad flat bladed screwdriver.
- Wrap a cloth around it to pad the blade to protect the glass and the unit.
- Push the screwdriver up behind the fitting and twist until it pops out.


Edited and hopefully clearer (April 2012 – have stuck labels on the original photos)
This is what we did, sorry if you are coming to this fresh, this is a very old post and I have amended it several times to try and make it clearer.
Technical Support at Velux Customer Services in the UK are very helpful on the phone.
Other useful information : Installation Guides to download from Velux’s site
The sequence as we did it : Blind in the up position before you start.
- Remove plastic clips at the bottom of each side rail, these stay attached to the guide strings, don’t try and detach them from the strings (the clips are quite fragile so handle cautiously)
- The side bars or side rails as we call them are screwed to the window frame and if you are removing the blind cartridge then you unscrew them first with the appropriate Philips screwdriver as they are dome headed screws.
- Then remove the blind cartridge either using a covered flat bladed screwdriver as we did, or try Mr McDonald’s method (see below) Velux said to us that they would replace any part that was damaged in the process, but worth getting that direct from them I would think. Good luck, it’s very stressful and Velux should really put something on their site about how to do this. I am surprised they still haven’t done so.
To get the cartridge to release : Velux told us :
‘Go behind the stuck unit from the glass side (or back) and push your padded screwdriver in as far as you can, and twist clockwise, a little twist at a time, starting close to the clip or edge of the window and work your way across towards the centre of the blind ‘
photos above of how this looks in practice
After a fruitless three hour struggle the day before trying to ‘reverse fit’ it by guess work, we rang Velux, got the above advice and thought we’d have one last go. We covered the top part of the glass with masking tape in an effort to protect it, and followed the above procedure. Apparently the narrower the blind, the harder it is to get it out again. This blind is very narrow. The screwdriver went into action and we got the blind out and didn’t break the glass. Hooray!
Then we refitted the pulley catch which was the culprit that had popped out and caused all the problems, and even remembered to clean the window – as once the blind is up it’s hard to clean behind it….and finally with great care and attention re-fitted the blind!
Here is the blind in all its sleep enhancing glory.
 I’d love to hear if you have any similar tales of DIY blood pressure raising trials and tribulations. Zeb, though beautiful, was no help, that age old problem of lacking opposable thumbs.
Edit November 2011 : Mr McDonald has recently wrestled with his blind and got slightly different advice from Velux and was kind enough to leave a comment below which I will quote here :
spoke with a very helpful chap at Velux (UK) and removed the blind quite easily. Method was this: 1) With the blind retracted fully, grasp the casing firmly at each end with your fingers at the back (between casing and glass) and thumbs on the front. 2) Now twist/rotate the case up and out (as if twisting case toward top of window frame) and listen for the ‘click’ of the catches releasing both sides. 3) When both catches released – blind should slide forward and out! Tried it and it worked a treat! Obviously no guarantee but was reassured by Velux that if the clips should break on attempting removal that they can supply a new set of brackets for re-installation.

Zeb is looking very thoughtful in that photo.
He’s wondering when we are going to stop messing around with screwdrivers and go out… ;)
Joanna, if I start venting about stuff that needs to be repaired around the house (AND LAB), you would have to ban me from your comments… so, let me just say you have my sympathies.
I am facing another morning waiting at home for the technician from the net/cable company – we have connections for 10 minutes at a time, then everything needs to be shutdown, wait 15 seconds, reboot etc etc….
oh, well – there are bigger problems in life!
Zeb is a cutie!
He he, I think that counts as a mini moan – I won’t tell you about the computer stuff, but draw a discreet veil over that. I hope your connections get sorted soon, but as you say there are many many bigger problems in life.
You might think this is mad, but I put in my ‘how do I uninstall velux window blinds’ google query in once I had written this post and was so pleased to see it come up on the first page.
That was the point of writing the post really, so if there is a cross, sad person out there in the same position they will have a procedure to follow. Of course if they break their blind/window in the process they might get mad. Maybe I should put a disclaimer on the post.
Hey, anyone reading this, if it doesn’t work, don’t blame me, blame Velux! ;)
My favorite ‘design flaw’ story, drawn from real life dates back some 20 years to when we lived in Jacksonville, Florida – we awoke one morning to the distant sound of rushing water, but a search of the entire house turned up nothing! Finally we realized that the sound was coming from under the floor. We called a plumber, who quickly appeared and assessed the problem. Almost immediately he had the answer – he told us that eventually all homes built on concrete slabs in Jacksonville suffer from the copper water pipes under the slab corroding due to the minerals in the city water – he went on to say that eventually, every home in Jacksonville would suffer the same problem as we, and that the answer was not to fix the present leak, but rather to install new PVC plastic water pipe ‘through the attic’, and to divert the water from the old copper piping system to the new PVC. I remember being astonished at hearing this and asking, ‘If that’s the case, why doesn’t City code require PVC piping on new construction?’ The plumber smiled and said, ‘Yeah, that would make sense, but it would also make a lot of people very unhappy.’
This is simply a tiny piece of what’s known in The Old South as, “The good old boy” system.
Are you sure your plumber wasn’t British? Did he suck his teeth and utter a long drawn out sigh, and then suck his teeth again. What are the minerals in the water in question? Limescale, acid? I find plumbing fascinating. The story of the Victorian plumbing in London, and all the stuff about how cities manage their water supplies and sewage – it’s all wonderful stuff, social history, technology. More stories please. As for ‘the good old boy system’ I guess that is a worldwide phenomenon too, transcending party politics and governments ;)
Your insight into the world-wide nature of the ‘good ol’ boy’ syndrome is probably spot on, but Americans know well that the Old South has no equal, at least in our nation.
And your interest in ‘the underground’ is very interesting – a few years ago, there was a series on U.S. cable TV about ancient underground parts of cities – most of course were in Europe (London, famously), but strangely, there were several in the U.S. For instance, Seattle was built on a bay, with the cities streets running right down to the water – however, they neglected to consider what they’d do with the occasional super high tide; seems the water sometimes came up 8-10 feet, flooding the entire bay front. But rather than build a dike to hold back the tides, they simply raised the street up high enough to cover the first floors of all buildings on the bay. And then they encouraged the owners to put stores under the street thereby creating a subterranean mall – probably America’s first.
I haven’t heard about what they did when they then had a super high tide. They no longer use this buried part of the city, however, they do have tours that still go down there – the rooms looked perfectly good to me.
Street raising is an old solution to ‘getting rid’ of parts of the city you don’t want. Makes archaeology such fun. At the moment various roads in my city are closed, due to a certain river, a gorge, collapsing tunnels and the like…. the forces of nature at war with the built environment, I know who I think will win in the end.
Joanna I’m sure Zeb was helping in his own doggy way. Project Manager I think Kevin McCloud would call it.
Hi Brydie, If he had been around when the trouble started I’m sure he would have thrown himself out of the window to distract us, but fortunately he was out most of the day having his summer bath and hair cut. He is very keen on step ladders, always tries to climb them :D
DIY- it always scares me.
I KNOW I’m going to break something further than it already is.
I’m like Zeb- although not so beautiful- encouraging but without usable opposable (thumbs?)
That’s why you wrap the screwdriver according to Brian. But I let him do the breaking potential activities and mutter encouraging words from a safe distance. I am a wimp.
We live on 40 acres, about 4 acres of which is garden and grassed woods – which need to be mowed. For such a big job we have a ride on mower, but our land is hilly and uneven and the trees constantly drop branches so the mower has a very tough job and frequently gets flat tyres. And therein lies our problem – getting the front tyres off requires some sort of obscure and arcane mechanics knowledge. The last time we had to repair the tyre, my husband got a friend who is a tyre fitter by trade to come up and it still took them an hour and a half to get the (expletive) thing off. We have replaced the tyres with hideously expensive, extra heavy duty tyres now, to try to reduce the frequency of stress-related, heart-attack inducing sessions.
Amanada, now you are on Brian’s speciality! He worked as a tyre fitter when he left school for ten years, pushbikes to planes, and he says, because the mowers have a low centre of gravity to stop them turning over when you turn, most of the weight is forced through the front drive wheels and the tyres have never been ‘man enough’ (tyre fitter’s phrase) for the job, they are usually very soft construction and they have very flexible walls. He says, descending into tyre speak here, it all depends on the type of rims, profiles of tyres etc. You will get more tyre failures if you mow when it is wet as the rubber is more likely to get cut. He sends you his sympathies as he has fitted many small tractor type tyres and he says they are not the easiest thing in the world to do!
…
He talked for about half an hour more on the subject of split rims to me, but my eyes started to glaze over. I wish I had grassy forests to roam in, though I wouldn’t like the mowing either xx
Wow – you’re a god-send. It’s a bit scary, isn’t it! Thanks, not sure how I would have done that without you. Perhaps Velux should include some instructions on the web site – it can’t be that uncommon a thing for people to do
Dougal you’ve made my day ! Thank you. Our one and only contribution to DIY on the internet, and why don’t Velux have instructions, one of life’s mysteries :)
Thanks for your article on the Blackout blind removal – happened on it through Google whilst facing the same dilemma! I spoke with a very helpful chap at Velux (UK) and removed the blind quite easily. Method was this:
1) With the blind retracted fully, grasp the casing firmly at each end with your fingers at the back (between casing and glass) and thumbs on the front.
2) Now twist/rotate the case up and out (as if twisting case toward top of window frame) and listen for the ‘click’ of the catches releasing both sides.
3) When both catches released – blind should slide forward and out!
Tried it and it worked a treat! Obvoiusly no guarantee but was reassured by Velux that if the clips should break on attempting removal that they can supply a new set of brackets for re-installation.
My reason for removal was that the blind material had detached itself from the bottom ‘pull down’ bar. Velux also assisted here by sending a link to the instruction for repairing this. Great service!
Hope this info may be of help to others.
Hello Mr MacDonald! Thanks for the info! It sounds as if different people at Velux have their own versions of how to get these blinds out, but the principle is similar. I just wish they had put something on their website about it, maybe they have by now.
I am surprised at how many people turn up on my baking blog just to read this one post. I really appreciate you commenting and I’m glad to hear you fixed your blind :)
Tried advice given by Mr McDonald on November 2011 and it worked a treat, after trawling through Velux Website to no avail.
Thanks for the assistance
That’s good to hear! It would be even better if Velux put the advice on their site one day wouldn’t it?
Hi!
My name is Richard. I’ve the same problem as you people. The cord of my blind has came out and is torn. I’ve bought a pair of new cords from the Velux Customer support, and going to fix my blackout blind tomorrow. I’ve searched the whole net, and i wasn’t able to find any guide for removing the blind. I was worried about cracking the window or something, while removing the blind. I am happy, because I’ve found your Blog, and the instructions written above. Many-many thanks for the advices.
Thanks for the feedback Richard. I hope one of these methods works for you and that your window survives. :)
I take it the info above from Mr McDonald is for removing the large metal structure that holds the blind at the top of the window. What about the side bars? They are clipped in at the bottom too. I don’t want to break anything. Is the picture of the screwdriver at the bottom of the window doing the bottom bracket un-clipping ?
Got to attempt this awful job tomorrow and really worried about damaging the window and blind!
Really , really cross that Velux doesn’t have anything on their website about removal of these damn things. I asked Velux this very question a while ago via e-mail and got absolutely no response. I have been trawling the web hoping to gain some knowledge before I attempted the job when I found this blog. Poor customer service from Velux for what are very expensive items.
Any further comments welcome to aid me welcome and wish me luck! If this works I can then remove my pleated blinds and clean out the insects stuck behind!
Hi TJToms. Yes the info refers to the top horizontal structure (the blind cartridge).
The screwdriver is not at the bottom of the window, It was only used to remove the cartridge at the top. We don’t have a bottom bracket so I am not sure what you are referring to. Maybe you have a different blind.
I recommend ringing Velux and asking for the Technical Support people as they are quite helpful on the phone.
http://www.veluxblindsdirect.co.uk/pick-and-click
Installation Guides to download in pdf format here
http://www.velux.co.uk/Professionals/Installation/VELUXBlinds/default.aspx
The sequence as we did it :-
Blind in the up position before you start..
1 Remove plastic clips at the bottom of each side rail, these stay attached to the guide strings, don’t try and detach them from the strings (the clips are quite fragile so handle cautiously)
2 The side bars or side rails as we call them are screwed to the window frame and if you are removing the blind cartridge then you unscrew them first with the appropriate Philips screwdriver as they are dome headed screws.
3 Then remove the blind cartridge either using a covered flat bladed screwdriver as we did, or try Mr McDonald’s method.
Velux said to us that they would replace any part that was damaged in the process, but worth getting that direct from them I would think. Good luck, it’s very stressful and Velux should really put something on their site about how to do this. I am surprised they still haven’t done so.
Joanna,
Sorry! I got the orientation of your picture incorrect. I can now see that you were at the cartridge end of the blind. I originally thought you were unclipping the side rails from the bottom plastic clip before moving on to the cartridge.
I’ll take your advice, keep the rails attached to the cartridge but unscrew them from the frame and also unscrew the plastic clip.
Once we have it removed (here’s hoping) we can see what is going on with the working of the blind. Currently we think a string has gone and it doesn’t pull down.
The side rails should just come off once you unscrew them, unless they’ve been painted over or something? One of our strings came off one of the pulley wheels inside, which is why we took it down. If the string is broken maybe Velux can replace it. This is one of those things that it is much easier to show someone than to write a step by step for, sorry if we confused you, I see what you mean about the orientation of the photo too, and I have dug out my old photos and added labels to make it clearer :)
Dear All, I have sent Velux UK a message via their contact form on their site this pm. I will let you know if I get an answer:
This is what I have said
“Dear Velux UK – this is for your technical team. I was just wondering if you realised that my little blog appears to be the main source of information as to how to remove your blinds. I don’t mind trying to help people but surely you should now put up a ‘de-installing guide’ on your site. Here is my post, as you can see from the comments many people are getting very frustrated. I get on average 200 hits on this post a day. kind regards Joanna “
Yipeee – it has worked!
Unscrewed the side rails and bottom clip and they came away. Pulled up and out on the top cartridge and it came away really easily too with no damage to the top clip on the frame.
Now we can diagnose the problem……..
One of the grey plastic cord guides on the cartridge ends has broken from a groove being carved into it over time from the cord, which then frayed and broke!. The cords also seems to be attached into a black plastic plate that fits on the end of the cartridge, and having taken it all apart we cannot workout how to disengage it.
We have taken lots of photos and now plan to e-mail them to Velux followed by phone call. It would be good to be able to show you but I can’t see how to do it?
I am hoping they have the spare parts we need otherwise it means a whole new blind – not cheap.
I have your email from where you log in to post comments so will email you with Brian’s email address (he knows more than me!) though I don’t know if we can figure it out for you. I can post the photos here once you have sent them through. Don’t make the files too big! Hopefully Velux will be open for advice this morning and have parts. Fingers crossed.
Did you get a response from Velux? One of ours has ceased reaching the end of the channel to black out completely, and after removing the side bars, I have found a groove in the plastic fitment on one side of the cartridge so assume it must stop the tensioning cords from functioning properly – hopefully they can supply a spare part or else……more money!
Afraid I didn’t John. Best thing I suspect is to ring them up. I wonder why they don’t want to resolve this more satisfactorily for everyone. Modern life eh?
Hope you don’t mind relating my own Velux blind woe here.
The cords that the blind runs on as you pull it up and down (either side of the blind) swap sides by running through the aluminium strip at the bottom of the blind material. Where the cords turn into the aluminium strip to cross over, there is a plastic runner.
On my blind, over time the cord has worn a groove into the plastic runner. Eventually the runner broke, and the cord wore itself out by rubbing on the edge of the aluminium strip (the blind worked perfectly till the cord damaged itself).
Sounds a bit like TJTOMS problem, but I’m not sure I understand what TJTOMS means by cartridge – his problem sounds like it is at the top of the blind – maybe it’s a different model. Be nice to compare photos.
Unfortunately Velux are telling me that nobody else has this problem so it must be an installation problem, so it would be good to know whether anyone else is.
I shall look forward to trying the advice here when I eventually have to take the blind off the window!
Hi Steve, changing my reply here…
We have crawled around and bent our heads upside down and looked and they do cross over and maybe they do wear over time but presumably they are replaceable. Has Velux offered to supply parts?
Will try and take a pic of the double blind one when it is not howling a gale and we can open the window and I will add it here. Almost impossible to photograph today!
Be good to see a photo of another blind.
The parts are replaceable, but in my case the cord got damaged when the part finally wore all the way through. Replacing the cord is quite a difficult task according to Velux. Velux are asking me to pay £14 for the worn-out part and £33 for the pack that includes replacement cords. So it would probably be more cost-effective to get a whole new one.
They won’t send me the parts for free because it is out of their three year warranty period. They have also suggested that the wearing may have been caused by twisted cords (I don’t believe the cords were twisted and I don’t believe that twisting would cause additional damage) and said that the instructions quite clearly said to not twist the cord (they don’t – I checked).
I think that additional evidence of wearing from other blinds would help me change their mind.
BTW I bake my own bread too :) I’ll be back for tips on Einkorn as my first loaf was a brick.
I haven’t had this problem yet , but our blind is relatively new under a year old. Maybe refer or copy the comments here in an email to Velux, I am happy for you to do that if it helps.
Velux were most unhelpful – surprise, surprise. They wouldn’t supply the expensive parts free as the blind was more than 3 years old, despite the fact that I am sure the cords frayed and failed due to a design fault. Just waiting for the other blind in the same room to go the same way!
Due to the expense of the parts we opted to buy a complete new blind but not from Velux direct as – guess what – they were more expensive. Also opted for a plain colour so that it is easier to match to when the other goes and we have to replace that one too.
Life has a habit of sucking money out of my bank account!
I am a bit out of my depth here, but there is The Sale of Goods Act and ‘reasonable expectation’ and all that. If you ring Trading Standards they are usually very helpful in regard to questions like this. I would expect the blind to last longer than three years, it is not a cheap piece of kit. If it is a design or ‘inherent manufacting fault’ then it is their responsibilty as far as I understand.
Just been reading through the posts again. I have the replacements parts info (with part numbers) from Velux if anyone is interested + photos of how my cords frayed and the groove that formed on the ends the bottom edge of the blind.
Zeb – If you can send me your e-mail address I can send them to you to up-load. I’ll make them as small as poss!
I just googled to see if anyone else was writing about this cord problem and found this thread on a consumer board, so maybe that would be a place to chat more about this for you all and share photos etc. Is it OK if I refer you over there as the cord thing wasn’t the subject of my original post? I suspect it was started by Steve above, though I am not sure.
Best wishes, Joanna
http://www.consumeractiongroup.co.uk/forum/showthread.php?353257-Do-Velux-black-out-blinds-have-a-design-flaw&p=3863332
Joanna,
I am happy for discussion to move to my CAG thread. Thanks for hosting my little get together!
You are welcome Steve – I hope that you have a good outcome.
Joanna,
The blind is 8 years old and used every day so it has had a good life. I’m still cross that I couldn’t get Velux to cough up the parts free – I’m usually good at getting stuff for nothing – but not in this case!
Thanks – pictures and Velux parts diagram are , once moderated, on the Consumer Action site.
Thanks for those photos on my Consumer Action Group thread “Do Velux black-out blinds have a design flaw?”. They show you had exactly the same issue as me!
Hi, after reading your notes tried “Mr MacDonalds Method” twisting the blind up and out and it worked prefectly. Took just a little effort but found that on pushing the edge of the fitting (the inner part facing the glass) in towards the centre of the window the blind popped out easily.
No need to use the screwdriver method or to put any pressure on the glass – looks like that was some “unnecessary” advice from Velux …
Steve
I’m glad to hear some part of my post was useful to you.
Thank you for a very helpful blog post.
First I tried Mr McDonald’s method. It seemed safer considering the risk of breaking the glass, but it didn’t work for me. I found it hard to jam my fingers in between the casing and the glass. Holding my hands like that, I wasn’t strong enough in my hands to twist the casing far enough for it to release the catches.
So I tried the screwdriver method. It was a little bit hard to get the cloth turn with the screwdriver, but once I got that right the casing popped right out. Nice!
But there’s one part in Velux’s description of this method that I don’t understand: ‘…and twist clockwise, a little twist at a time, starting close to the clip or edge of the window and work your way across towards the centre of the blind‘
I kept working as close to the catch (at the edge of the window) as I could. In my opinion that’s where you should apply the force, as close as possible to the catch that you want to release. Working you’re way towards the centre of the blind doesn’t make any sense. But that’s my opinion and maybe I misunderstood something.
I’ll e-mail Velux and tell them that it would be quite customer friendly if the put instructions like these on their web. Or perhaps even better; if they redesigned their products so that they were easier to uninstall.
Thanks again.
Erik
Thanks for your feedback ErikErik :)
Thanks for this topic!
The fingers and thumbs method worked easily for me.
All of my older Velux blinds have had frayed cords caused by the cord cutting into the plastic.
Definitely a design flaw – the newer ones are much better.
I have steadily replaced them all, and fitted thin metal strips over the edges that wear through.
This has largely overcome the wear problem, but requires the blind to be dismantled.
When I am lucky (rarely), the blind doesn’t unravel its rewinding spring.
Otherwise I have to laboriously rewind them manually.
Regards,
Hamish.
You are welcome Hamish, sounds like you have worked really hard maintaining your blinds, ours is currently fine. I just have to remember to open both sections as sometimes a bit of condensation builds up behind the inner blind if I don’t. Joanna
Hi, I’ve just tried the ‘Mr McDonald’ instructions to remove my Velux blind & it worked like a dream, thanks muchly!
You are most welcome Bev :)