Tag Archives: baking

Andrew Auld’s 100% Spelt Bread (a formula from the Loaf in Crich)

100% Spelt Sourdough, the loaf in Crich

Spelt grain belongs to the wheat family of field crops.  It is often described as being an ancient grain or a heritage grain.  Interest in these heritage grains has increased in recent years, both on the part of consumers and amongst researchers into crop genetics with an eye to maintaining a gene reservoir for breeding programmes.  The ancient grains are credited with being more adaptable to poor soils and harsh climactic conditions as well as having attractive nutritional attributes.

Spelt contains gluten and is not suitable if you have coeliac disease. It is claimed that some people find it easier to digest than bread made from more modern wheat; this is something that I am not qualified to comment on. I personally find rye bread easier to digest than wheat bread, but maybe that is because I ate a fair bit of it when I was a child, who knows?

I remember our first encounter with spelt flour vividly; Brian bought a bag home one day and said he was going to make Roman Centurion slipper bread, this was in the days when we really hadn’t done any bread baking at all at home and this was the recipe on the side of the bag. I can’t even remember which brand it was now. We mixed the dough and produced some very flat and rather strange bread that we didn’t like very much, deciding that Roman Centurions probably used it in their boots for extra liners, and the bag of flour disappeared onto the back of the shelf.

Recently I was asked by a friend if I could make them an all spelt loaf and I had to say that I wasn’t very good at making them, so I asked Andrew at the Loaf in Crich for his formula (having seen a lovely photo on Twitter of his loaves, looking all nicely risen with good open slashes) and he kindly shared the recipe and here it is for all to try.

Like so many of the breads and cakes I make I don’t make them over and over again until I get them absolutely right before I write about them here. I am not that sort of blogger. To a certain extent for me, every loaf is a bit of an experiment, I learn (or re-visit the same mistakes!) each time I add water to flour. Even though I have been baking for a handful of years now, the number of loaves I have actually made is probably less than a professional baker would make in a few days.

So after all that preamble – here goes!

Andrew Auld’s Spelt Bread (from the Loaf in Crich)

Andrew’s formula uses a rye sourdough starter to start the whole process off,  which he calls a ‘rye sloppy’.  If you only have a wheat starter then you can convert a small proportion of this to rye over a few days by feeding it with wholegrain rye flour and water instead. I keep both a wheat starter and a rye starter going, I refresh them once a week if I am not using them for baking and keep them in the fridge unless I am planning doing a lot of baking over a period of a few days.  If you are not worried about a small proportion of wheat in your bread then just use your wheat starter.

Spelt Sourdough Biga

The day before you want to bake

1st stage

Mix a biga with

  • 24 g rye starter
  • 80 g water
  • 100 g white spelt flour
  • 100 g wholegrain (wholemeal) spelt flour

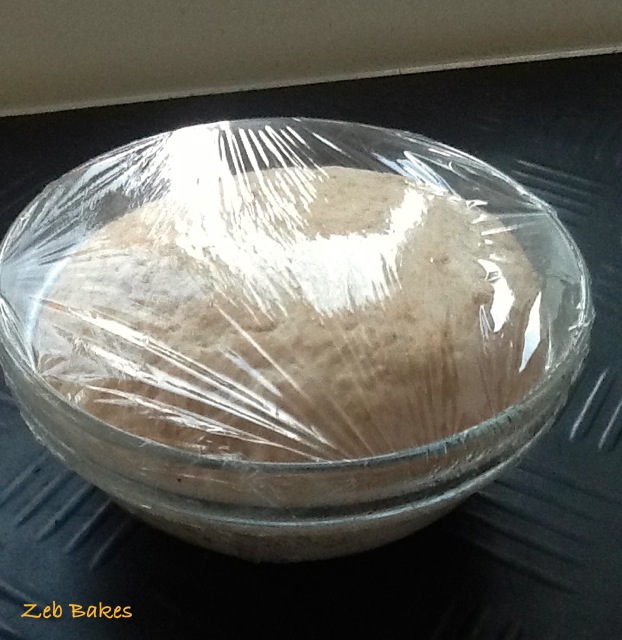
Leave in a covered bowl to ferment. The time this takes will depend on how warm it is. I left mine overnight.

2nd stage

  • 640 g white spelt flour
  • 160 g wholemeal spelt flour
  • 80 g orange juice
  • 12 g honey
  • 12 g salt ( I upped this to 15g as I felt it was a bit low for my taste, I wonder if the low salt contributes to the faster proving times, that is something to bear in mind and salt is very much a personal preference)
  • 440 g water
  • 300 g biga (as from the first stage)

Mix all the above together well and leave for three hours to prove, folding the dough twice during that period.

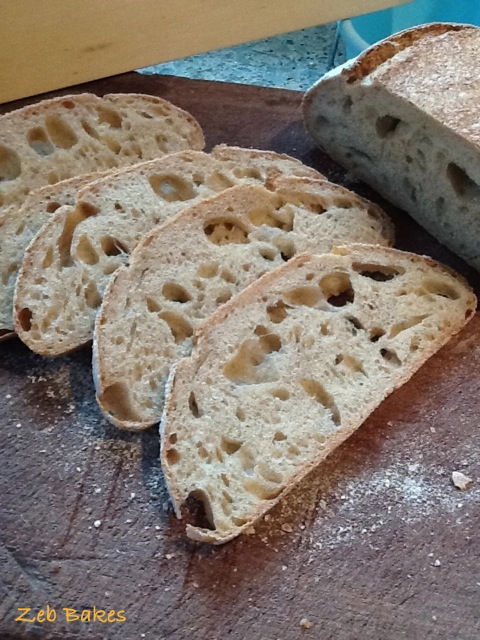
Shape the dough as you like, I proved these in bannetons.  I made three smallish loaves of around 550 g each, then leave for a shortish final prove. I baked these after 45 mins proving in front of a radiator –  a much shorter time than I would usually leave a sourdough loaf on its final prove – and I think that has been my mistake in the past, leaving spelt too long on the final prove, Andrew’s note to me indicated that might be a good way to go.

When experimenting with a dough that is unfamiliar, do make notes, I would try and remember if it was hot or cold, if possible have a little temperature gadget in your kitchen. I have one from the Science Museum in London that is very useful. Note the ambient temperature and the times the dough has sat in prove (be honest here, if you forgot it, then write it down regardless!) and if possible take photos to jog your memory. Keep making the same dough and either shorten or lengthen the proof times and you will get a result you like in the end.

Spelt sourdough loaf on a cold day

I baked these smallish loaves at 220 ºC for about 20 minutes and then reduced the temperature to 200 ºC for another 20 minutes and that seemed about right. I tend to bake my bread longer than many people do. I see commercially that bread seems to be baked for shorter periods of time, maybe a commercial oven is different but I prefer a ‘well-baked loaf’ nearly always.

My small thoughts :  handle this dough gently, don’t knock the air out of it when you fold it, and be kind to the dough when you come to shape it;  try and preserve the air that is in the dough from the first fermentation stage. The folding process stretches the bubbles that are forming and traps them in the dough, and they help to give the dough some structure.

Spelt Sourdough Crumb Shot

Don’t spend a long time staring at the dough once you have turned it out prior to baking it. Slash it simply with one long angled cut, slightly off the centre line as if you are slitting an envelope –  the more cuts you make on the top, the more the dough will lose surface tension and flatten out. Decide what you are going to do before you turn it out and be quick and decisive and get it into the oven nice and speedily. An old slashing post of mine here might give you some ideas here.

Spelt flour is also lovely in biscuits and cakes, so you can always use it that way too.

I guess I should be thinking about festive baking… I have been reading lots of lovely blogs full of exciting projects, but I haven’t lifted a festive finger yet, no shopping, no crafting, nothing has happened here.  This is not to say there won’t be any but don’t hold your breath!

If any other spelt fans want to share their tips and thoughts on baking with spelt I am all ‘ears’ !

A Home Loaf and Britain’s Best Bakery on TV

sourdough with braided top, Zeb Bakes, What I made today, (except of course I started yesterday)

The Day Before Baking

Mix together well

  •  50 g of once refreshed starter
  • 200 g  breadflour
  • 250 g water

Leave for 12-16 hours in a cold kitchen;  6-10 hours in a warm one

The following day

Mix a dough with :

  • 450 g of the above
  • 400 g water (approx, may vary depending on how much strong flour you use)
  • 350 g very strong bread flour
  • 300 g regular bread flour
  • 150 g dark rye flour
  • 1 tablespoon of dark malt dissolved in water
  • 5g dry yeast
  • 20 g fine sea salt
  1. Mix well and knead or not as you prefer.
  2. First prove 3 hours with two folds at hourly intervals.
  3. Shape and Second prove of about 2 hours
  4. Turn out onto peel
  5. Bake in a preheated oven  with steam at 220 °C for 25 mins and then reduce heat to 200 °C for a further 20 – 25 mins.
  6. Cool on a rack.

Baking notes:

Despite the extra bit of yeast, this dough took about three hours to do its first prove. My kitchen was around 18 C most of the day so after an hour or so I put the dough inside my top oven with the door held slightly ajar with a teatowel in the door so the oven light would stay on.  The light was enough to bring the internal temperature of the oven up to around 24 C. I needed to rotate the bowl occasionally as one side got warmer than the other but it works very well and isn’t as expensive as putting the heating on just for the dough!

I then split the dough into two and thought I would have a go at making a loaf with a braid on the top.

I took three balls of 60 g of dough each and rolled them into long even strands and made a three stranded plait which I put in the bottom of the banneton. Then I added a boule of dough on top of that, so that when I turned it out the plait would be on the top.

sourdough with braided top

If I do this again I will make longer strands and a fatter plait, maybe 90 g per strand.  The dough that forms the main part of the loaf weighed 850 g. I made the remaining dough into a smaller loaf.

Why the braid? I have been watching Britain’s Best Bakery on ITV1 for the last couple of weeks, cheering on all the wonderful bakers, patissiers and cake makers who have been brave enough to let a TV crew into their workplaces and film them.

I was very taken with the wonderful showpiece sourdough loaf made by the Metfield Bakery  in Suffolk which had a plait on the top. The judges thought their sourdough was amazing and I had never tried putting a plait on the top of a loaf so I thought I would try for a bit of fun and a sort of homage.   Predictably mine has come out looking nothing like the one I saw on TV, mine looks a bit like a drunken Roman Emperor, whose laurel wreath has tipped over the side of his head after imbibing a bit too much wine…. (Edit: Stuart from Metfield Bakery has left some helpful tips in a comment below, thank you Stuart!)

sourdough, homage to Metfield Bakery

Watching the shows I was struck by how passionate the bakers are, how much they care about their craft.  The show has a competitive element, but in some ways that is the least important part of the show for me. I just like to watch the teamwork involved, the dough being shaped, admire the different ovens, the mixers, the hustle and bustle, and the icing on the cakes.

The judges have a delightful manner and accentuate the positives they find in each and every one of the bakers they talk to; the challenges they set the bakeries are quite fun, but a bit random and not necessarily equal in skill difficulty.   The section where they visit the bakeries and have a look round and a quick chat and a few words from enthusiastic customers is for me the best part of the show. They showcase the bakeries and their warm, inviting interiors and beautiful displays of cakes and breads, their cafés and delighted customers really well.  I found myself making mental notes about where they all were and hoping that one day I would get to pop in and sample their baked goodies for myself.

I really enjoyed seeing my friends at the Loaf in Crich who were on this week, the judges were very complimentary about their big green olive sourdough and it was lovely to see the shop and café humming with life and happy customers. I have almost got the 100% spelt sourdough (my personal nightmare) right now, thanks to expert advice from Andrew at the loaf.

100% spelt sourdough

Here it is looking decidedly more airy than my usual bricks. One of the most rewarding things about dabbling in breadmaking has been all the wonderful people I have come across while doing it. Andrew is one of those people who has always been kind hearted and encouraging. We all need encouragement.

It is well worth having a look at, recording or using Catch up TV options to whizz through the adverts and share in the delight and see places that you might want to visit if you were in that part of the UK. The series is in the second of four weeks, so plenty of time to catch some of the shows as they travel around the UK.

By the way….

In Bristol we have the brand new East Bristol Bakery in St Mark’s Road, Easton and Laura Hart is opening her new bakery this Saturday 8th December, both highly recommended!

I get so excited when I walk past a bakery and I always have to go in and buy something, even if I have a breadbin full at home I can’t resist.

Confessions of a Gibassier Groupie

GibassiersBaking buddies here is a post about these lovely Provencal sweet buns called Gibassiers which I have had my first go at baking inspired by the enthusiasm of Lynne who tweets as @josordoni and is a wonderful food blogger. They are a bit like brioche, but not as buttery, a bit like a doughnut, but not heavy, lighter than teacakes and really very good indeed.

Lynne has made these several times in the last month, and after a bit of hemming and hawing and hunting down ingredients on my part and a lot of encouragement from Lynne I had a go, along with  Thane Prince and Carla Tomasi on Twitter.

On the subject of orange blossom water, this brand, Cortas, is much much more pungent and flowery than the English variety. I sourced this at Bristol Sweet Mart, in St Marks Road in Easton, Bristol. Worth looking for if you can find it. As you open the bottle you are transported to a world where the sun shines and people hang out on dusty streets on humid nights and chat because it is too hot to go to bed. I reckon though that one could zest oranges, or use whatever you have to hand or can get hold of that makes you think of oranges.

There are a few recipes around, Lynne has tweaked hers over various bakes, you can read all about her experiments on her Greedy Piglet blog and she has very generously said I can write about it too, so here goes!

I have also bought Ciril Hitz’s book, Baking Artisan Pastries and Bread, the recipe has come from there, via The Fresh Loaf, and is reproduced in several places on the internet as well if you google. The book has loads of detail in it and some brilliant information about making laminated and sweet doughs and I am going to enjoy reading it and there is a DVD with it which I would love to be able to play for you, because it explains it all much better than I can. Bear in mind if you do this from this post that I have only made this once.

The day before you want to bake

Make a pre-ferment. This simply means mix up the following three ingredients and leave them covered overnight. The mix makes a firmish ball but it loosens and softens up once it has fermented.

  • ¼  – ½ tsp of dried yeast
  • 180 g of all pupose or bread flour
  • 110 g of milk

Day 2

Make a liquid mixture of:

  • 4 small eggs plus one yolk –  about 180g of shelled eggs  ( 2nd time made these used 130 g egg in total)
  • 80g of light olive oil (2nd time used 65 g olive oil)
  • 35 g of Cortas Orange blossom water but you will need more if you use a weaker one (2nd time used a mix of obw and dry Marsala wine, Carla’s suggestion)
  • 35 g warm water

NB: this is quite a lot of liquid and if you are not sure about your ability to work with a fairly wet dough then use less egg and less water, more like 150g of egg and 25 g of water as the original recipe.

Some recipes recommend warming all these together and that is probably a good idea. I whisked quite hot water into the top three ingredients and they didn’t curdle, but it might be safer just to heat very gently in a bowl on top of a pan of hot water… ?

In another bowl sift together

  • 200 g 00 flour or all purpose flour
  • 200 g bread flour
  • 100 g sugar
  • 6g salt
  • 12 g yeast – I used less yeast than Lynne but I am using that active instant sort which is very busy stuff (Second time used 10g yeast)

You might as well get the other stuff ready now too

  • 70 g softened unsalted butter
  • 1 tsp of crushed aniseed seeds
  • 70g finely chopped candied orange peel

All the above are going in the dough

You will also need a bit later on in the proceedings :

  • some egg wash (this is a beaten egg and a bit of milk whisked together)
  •  about 100 g melted butter
  • a bowl of caster (fine) sugar to dredge the buns in once they have been baked. (Second time used granulated and it doesn’t stick so much or melt like the caster sugar does)

I am not the best person at being organized but on this occasion I did do a proper mise en place and got it all ready. The trouble with buns is that there are lots of processes and I run out of surfaces to put things on if I don’t make a bit of an effort. Note on flour: use what you have, don’t not make these because you don’t have 00 flour, use your regular bread flour just not the very strong baker’s sort.

I freely admit I didn’t handmix this so if you are going to do this by hand do read Lynne’s blog as she is very good at this and there are ways to do it that make it easier.

I used the Kenwood as I hate handmixing sticky doughs like these, but then I have become a bit of a wimp in these matters.

I put the liquid mix in the Kenwood, added the pre-ferment which I broke into small chunks and let it all mix up for a bit to loosen the preferment. Then I added the dry ingredients first and mixed them up till it looked plausible, probably for about three/four minutes, then added the softened butter bit by bit till it was all taken up by the dough and the dough was taking on a soft and silky look and feel, that takes a fair bit of time (and forms a gluten window – yes I did that the second time. The dough also gets lighter in colour once the butter is worked in properly, a good clue to look for ) and then finally sprinkled the seeds and the candied peel into the dough and worked that in too.

Then I left it all to rise in a covered bowl. Currently I am using my little top oven as a proving chamber. I open the door and the light comes on then I put the bowl in, and close the door but keep it open a crack by stuffing a tea towel or the oven gloves in the door. It reaches a temperature in there of about 24 – 26 C which is good enough for me.

After an hour and a half, it was huge and bubbly, a very excitable dough!  I floured a board, and pressed it out gently and then cut it up into 15 x 80 g chunks, quite big buns these were, you could make smaller or bigger or make it all as one big bread, or all sorts.

I rolled the pieces into balls and then started to shape them. If you have ever made fougasse or bagels you will know that any hole you cut or shape in a lively dough will fill in as it rises and again when it bakes, so be bold with your holes and don’t forget to stretch the shapes out sideways before you put them on your parchment lined trays to prove.

Gibassiers being cut and stretchedI flatten the balls into ovals and used a little cheese knife to make the cuts. I have just watched the bit on the DVD which comes with the book and it really shows it beautifully there, as well as what the dough should look like. Aha.

Here is one of my little drawings indicating where the cuts go. The ones in the middle you need to do with something fairly short that you can push directly into the dough, not a knife.  The edge cuts you can do with the edge of a dough scraper or a knife.

Leave to prove till they are nice and plump but not deflated, I left mine for another 40 minutes this time.

Eggwash the buns before you bake them in a hot but not too hot oven. I have funny settings on mine, my fan is about 10 degrees hotter than most people’s  (Neff Circotherm settings) so I baked mine on 170 C, look up the equivalent of Gas Mark 6 for your oven. Take them out when they are golden. I checked them after 12 minutes, I think I took them out after 15 minutes and maybe they could have come out earlier.

Paint them with melted butter while they are still hot, then let them cool down a little and dredge them in sugar. If you do the sugar bit while they are too hot, I did that with one lot, the sugar starts to melt.

Instagram Gibassiers

Share them out, give them away, save a couple for you and a friend, warm in the oven a little before you eat them. That’s it!

PS here is the last one being shared with Brian for breakfast yesterday, might have to make some more soon…

PPS Update:  For those of you who come back to read this again, I have been reading Ciril Hitz’s book and am learning new stuff about mixing these doughs. It’s very exciting and I’m going to have another go. If you look at the rounds of dough in the first photo you will see that they look a little greasy, I think that is because my butter was too warm when I mixed it into the dough. Ciril Hitz says that the butter should be pliable but cold, not warm when it is mixed in. So to do that you need to take a cold piece of butter and bash it with a rolling pin or something and then mix it in bit by bit, even putting the bowl back in the fridge if it looks like it is getting too hot.  I did say this was the first time I had made these didn’t I?

Update: I made them again the following week, hence all the notes in brackets. I am sorry if it confuses anyone actually trying to bake from this. Basically if you use less egg, less oil and cold  pliable butter, and knead for longer you get a more elastic dough which is slightly easier to shape and is more bread like and less brioche like.  I wanted to try both ways and see if I could see a difference. The only other very slight change I make is that I use the small amount of water to loosen the preferment in the mixing bowl before I add the other liquid ingredients. It just made sense to me to do that. I don’t intend to rewrite the post, but if you are seriously trying to make these then do ask if I have confused you or better still buy a copy of the book!

Here are a few photos from the second time I made them, a bit fuzzy, but they show the cutter I made second time round…

Cutter made from a dough scraper

Cutter made from a dough scraper


Cut bun before being stretched out gently

Cut bun before being stretched out gently


Stretching out the bun

Stretching out the bun

A shared Gibassier and some rare sunshine!