
 I have made two lots of marmalade, started on 1st January which seems a long time ago now and then I moved on to the Seville Oranges when they arrived in the shops. Then I got bored with chopping peel and I cut my finger (poor little me!) so used up the remaining Meyer lemons and Sevilles in the house, which were getting a little ripe to make divine fruit curds which are now in the fridge. We love lemon curd and we love Seville Orange curd too now!
That is my red chilli plant in the kitchen still fruiting away in case you were wondering.
 Did I tell you about the Meyer lemons, fabled for their sweetness and aroma, a fruit well known to Americans, but one I had never seen here. Gloria Nicols went shopping in Bristol and tweeted that she had found them at Tescos so we went off to find them and we did! I got some for a friend too who lives in a food desert in the East of England where their Tescos don’t stock such delights and gave her some as well at Christmas, the exchange of food being a great excuse for a get together!( along with smoked bacon ribs from Cockermouth, a Northern delicacy rarely seen in the South. But I am guessing it will become trendy one of these days to nibble on boiled bones once again… mark my words… but I digress)
The lemons are indeed quite different from Sicilian or Greek lemons, they have a delightful aroma of clementine and what I imagine is a laid back Californian sort of way about them, the sort of lemons that rollerblade and don’t moan about the weather.
I made luscious lemon curd with them two times. The second time I reduced the sugar as the first batch was a bit sweet for our tastes.
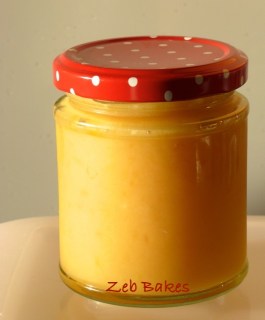
Meyer Lemon Curd
- Four ripe Meyer Lemons, finely zested and juice squeezed out. If you mash the remains gently in a sieve you can get a little thick extra goodness out of the pulp.
- 4 large eggs, lightly beaten
- 125 grams of unsalted butter, softened and chopped into small pieces
- 250 grams of sugar
Note: if using regular sour lemons or bitter Sevilles you might need more like 300 – 325 grams of sugar, but it is all to taste, best thing is to dissolve it all first and have a taste and take a view before you start the final cooking part. You might find you get away with a lot less sugar or you might be able to use half and half, I am not sure.
3 – 4 seven oz jars, washed and put in a warm oven to sterilize them. Lids in saucepan of boiling water on the hob. (I got three jars out of the above quantity and a ramekin over)
In a bain marie, or a bowl over a saucepan of simmering water, put all the zest, juice, butter, sugar and beaten eggs together and stir until the butter and sugar is all dissolved. If you don’t want any stringy bits in your curd, then it is probably a good idea to sieve the eggs first. I forgot and just hoiked out the stringy bit when I saw it lurking in there.
Keep the heat low, a gentle simmer, not a fast boil. If it is too hot you might get a scrambled egg effect. Stir continuously and watch the colours change gently in the pan. You might get a little foam as the eggs start to cook, turn the heat down, if necessary remove the bowl from the pan and allow it to cool down a bit. The most important thing is to keep stirring and be patient. The curd is ready when it coats the back of your spoon like a thin custard or single cream. It will thicken up more once it has cooled.
Boil up your funnel and ladle and put it into your jars and screw the lids on tightly. Books vary in saying how long it keeps from a month to three months. We try and eat it within a month but Brian remembers his Gran making it and keeping it in the larder for several months.
For the Seville Orange Curd I followed the same procedure as above, (I had six oranges left) used more sugar (325g) as the juice was more sour.
There was more juice so it took longer to set off and gave us four jars as opposed to three. I didn’t use more butter though or more eggs. Some recipes suggest adding cream or extra egg yolks, I think it is just one of those things that you can be fairly relaxed about. Keep the temperature low and stir constantly and you should be fine. Or try Celia’s microwave method which she blogged about here.

You can eat the curds just as they are with a spoon. You can spread it on toast, on teacakes, use it in pastry tarts, to sandwich cakes together, dip your Gibassiers in it for complete luxury and just enjoy it. It’s the sort of thing I make once a year and eat and give away and then it’s gone till next time. Though now I think about it, there is no reason not to make it more often…
There was a cake with a delicate lemon glaze for a while in the kitchen too. I liked these lemons and hope that we continue to import them into the UK.

 Baking buddies here is a post about these lovely Provencal sweet buns called Gibassiers which I have had my first go at baking inspired by the enthusiasm of Lynne who tweets as @josordoni and is a wonderful food blogger. They are a bit like brioche, but not as buttery, a bit like a doughnut, but not heavy, lighter than teacakes and really very good indeed.
 I flatten the balls into ovals and used a little cheese knife to make the cuts. I have just watched the bit on the DVD which comes with the book and it really shows it beautifully there, as well as what the dough should look like. Aha.
 Here is one of my little drawings indicating where the cuts go. The ones in the middle you need to do with something fairly short that you can push directly into the dough, not a knife. The edge cuts you can do with the edge of a dough scraper or a knife.


